Monday, November 5, 2012

Seasonal cake and cup cake flavors until Dec 31st

Cakery Creation just launched their seasonal flavors. Click here to see what we are offering until Dec 31st!


Liz @ Cakery Creation
Visit our facebook page and like us at: https://www.facebook.com/cakery.creation
or Twitter @cakerycreation
Cakery Creation provides wedding, birthday and other specialty cakes and cupcakes in Volusia, Flagler, St Johns and surrounding counties.

Palm coast wedding cake: Beach Theme

Beach Themed wedding cake in Palm Coast Florida.

Liz @ Cakery Creation
Visit our facebook page and like us at: https://www.facebook.com/cakery.creation
or Twitter @cakerycreation
Cakery Creation provides wedding, birthday and other specialty cakes and cupcakes in Volusia, Flagler, St Johns and surrounding counties.

Bird Cage Cakes

The bird cage cakes were created for event in St Augustine Florida that took place in the Lightner Museum.

Liz @ Cakery Creation
Visit our facebook page and like us at: https://www.facebook.com/cakery.creation
or Twitter @cakerycreation
Cakery Creation provides wedding, birthday and other specialty cakes and cupcakes in Volusia, Flagler, St Johns and surrounding counties.

Wedding cakes in Palm Coast, Daytona, St Augustine


Black lace, red roses and cameo brooches cakes. These cakes were for an event in St Augustine Florida. The theme of the party was a Victorian Halloween Soiree. Cakery Creation created the beautiful cake stand from an old chandelier and then topped it with 4 single tiers and one 2 tiered cakes. Each cake was design with edible black lace, skulls cameo brooches and deep red gumpaste roses.

Liz @ Cakery Creation

Visit our facebook page and like us at: https://www.facebook.com/cakery.creation
or Twitter @cakerycreation
Cakery Creation provides wedding, birthday and other specialty cakes and cupcakes in Volusia, Flagler, St Johns and surrounding counties.

Wednesday, September 26, 2012

Jim Beam Cake


We made this Jim Beam cake with permission from the Jim Beam Co. and it's all edible.


Liz @ Cakery Creation

Visit our facebook page and like us at: https://www.facebook.com/cakery.creation
or Twitter @cakerycreation
Cakery Creation provides wedding, birthday and other specialty cakes and cupcakes in Volusia, Flagler, St Johns and surrounding counties.

Saturday, August 11, 2012

Black and White Wedding cake by Liz at Cakery Creation, Wedding cakes in Palm Coast

Black and White Wedding cake by Liz at Cakery Creation, Wedding cakes in Palm Coast.
Liz @ Cakery Creation

Visit our facebook page and like us at: https://www.facebook.com/cakery.creation
or Twitter @cakerycreation
Cakery Creation provides wedding, birthday and other specialty cakes and cupcakes in Volusia, Flagler, St Johns and surrounding counties.

Bubble Guppies Themed cake by Liz at Cakery Creation. Cakes in Palm Coast

Bubble Guppies Themed Cake with matching goldfish cake pops


Specialty cakes in Palm Coast, St Augustine, Daytona Beach and Jacksonville areas.

Liz @ Cakery Creation
Visit our facebook page and like us at: https://www.facebook.com/cakery.creation
or Twitter @cakerycreation

Wonder Woman Themed cake by Liz at Cakery Creation. Cakes in Palm Coast

Wonder Woman Themed cake 


Liz @ Cakery Creation

Visit our facebook page and like us at: https://www.facebook.com/cakery.creation
or Twitter @cakerycreation
Cakery Creation provides wedding, birthday and other specialty cakes and cupcakes in Volusia, Flagler, St Johns and surrounding counties.

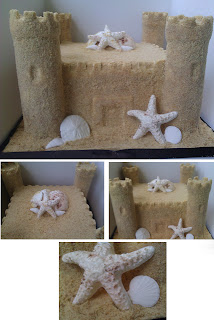
Sand Castle Cake by Liz at Cakery Creation. Cakes in Palm Coast

Sand Castle Cake
Cakery Creation's Castle cake
Specialty cakes in Palm Coast, St Augustine, Daytona Beach and Jacksonville areas.

Liz @ Cakery Creation
Visit our facebook page and like us at: https://www.facebook.com/cakery.creation
or Twitter @cakerycreation

WWE wrestling ring cake by Liz at Cakery Creation. Cakes in Palm Coast

WWE wrestling ring cake


Specialty cakes in Palm Coast, St Augustine, Daytona Beach and Jacksonville areas.

Liz @ Cakery Creation
Visit our facebook page and like us at: https://www.facebook.com/cakery.creation
or Twitter @cakerycreation

Super Hero themed cake by Liz at Cakery Creation. Cakes in Palm coast

Super Hero Themed Cake

Specialty cakes in Palm Coast, St Augustine, Daytona Beach and Jacksonville areas.

Liz @ Cakery Creation
Visit our facebook page and like us at: https://www.facebook.com/cakery.creation
or Twitter @cakerycreation

Monkey Love themed cake by Liz at Cakery Creation. Cakes in Palm Coast

Monkey Love themed cake. 


Specialty cakes in Palm Coast, St Augustine, Daytona Beach and Jacksonville areas.

Liz @ Cakery Creation
Visit our facebook page and like us at: https://www.facebook.com/cakery.creation
or Twitter @cakerycreation

Friday, August 10, 2012

Sand Castle Cake tutorial by Liz at Cakery Creation

Sand Castle Cake Tutorial


Step 1: Cut paper towel cardboard tubes to desired length

Step 2:Cover tubes in gumpaste. Using a ball tool press into the gumpaste for the window

Step 3: Measure around your covered tube. Roll and cut out a piece of gumpaste specific to your measurements. This is going to be the top portion of you castle turret. Once you have your desired gumpaste piece you can use a cutter like this one above to cut out the top of your turret. If you dont have a cutter like this one use a basic square cutter and cut out little spaced squares to make this pattern. Now attach your gumpaste piece to your tube with a little bit of water.

Step 4: Once you've attached your piece flip it upside down letting the inside lip rest on some type of support. Mine just so happen to be the perfect size for a spice bottle.Let dry for about 1hr.


Step 5: Now crush up a 1 to 1 ratio of animal crackers and vanilla wafers. Dump the crushed cookies into a pan. Moisten your turret lightly with water and roll it in the crushed cookies. Once coated set aside to dry and start working on your next turret. By the time you are finished with your 4th turret the 1st one should be dry and start this process again. Do this step 3 times. coating 3 times ensures a nice even coat of cookies. Side note:  After the 1st round they will look a little lumpy in some spots this is okay because by the 3rd time everything evens out.

This is what they will look like by your 3rd coat.

Step 6: Butter cream your square cake and cut a small piece of each corner off. This allows the turrets to rest against the cake. Since the turrets are not going to be eaten I just hot glued them down to the cake board.


Step 7: Now that your turrets are in place. Measure the length each side of your cake. Cut out a strip of fondant to that measurement. Using the same technique from step 3 cut out the square pattern on the top of the fondant strip. Attach this strip to the top of your cake with a little bit of water. Do this for all 4 sides of your cake.

Step 8: For the door all I did was use 2 square cutters. Cut out a large square piece of fondant then take a slightly smaller square cutter and cut out the center of  the larger square. Attach the square with a little bit of water.

Step 9:To add the crushed cookies to the cake all I did was moisten the fondant pieces and start lightly pressing the cookie into the cake. To help this along I would press the cookies into the cake with a fondant smoother.

You might have to pipe extra butter cream into the turret corner to fill in any gaps then add the cookies.

I added white chocolate shells to this cake. I used a shell chocolate mold and filled it with white chocolate put in the icebox for a few minute to harden then added them to the cake.

There you go!

Specialty cakes in Palm Coast, St Augustine, Daytona Beach and Jacksonville areas.

Liz @ Cakery Creation
www.cakerycreation.com
Visit our facebook page and like us at: https://www.facebook.com/cakery.creation
or Twitter @cakerycreation

Wednesday, July 25, 2012

Peek-A-Boo Boobie cake with black ruffle bra tutorial

Peek-A-Boo Boobie cake with black ruffle bra tutorial:
I used 2 half sphere pans shown above. Bake your cake and then let cool. Place them in position on cake board. Then coat with butter cream and place in icebox for about 1hour to chill
take cake out of icebox, roll out ivory fondant or whatever flesh color you want to use.
Cover your cake with your fondant. Trim edges and smooth with hands.
Make sure you press into the top between your 2 cake so you get the "v" shape (cleavage).
next roll out black fondant big enough to cover part of one side of the breast. Cut a straight line on one side of the black fondant.
Brush bottom half of breast with edible glue. Place the straight edge along one side of the breast. Trim excess and smooth with hands.
Now do the same thing for the other side.
Take a small circle cutter for the nipples.

Attach nipples on cake with edible glue and take a tool with a point  or toothpick and poke little holes for the spots around the nipple.
Now cut a long strip of red fondant. This is to make the ruffles of the bra
fold and pinch the bottom of the fondant to form the ruffles.
looks like this as your working the folds
Here's another look
Now cut off all the extra fondant on the bottom half of your ruffles
Run edible glue along the edge of the black fondant. Now attach your ruffles on both sides of your bra.
I have a string of pearls mold so I just use this for the trim of the bra. But if you don't have a mold like this you can just roll little balls of black fondant for the trim.


Now attach your pearls along the edges. Once you attach your pearls on all your edges make a little ruffle pom pom for the center of your bra. The ruffle pom pom is made the same way as the ruffles for the trim but
 you are just bunching them together to form a circular pattern. Attach it with edible glue.


There you go!!!!  
Liz @ Cakery Creation
Visit our facebook page and like us at: https://www.facebook.com/cakery.creation
or Twitter @cakerycreation